GIS 540
Create the extended proposal based on the instructions below and submit to Moodle. Grading criteria are at the bottom of this page.
Revise original content based on any change of plans and based on comments in the feedback you received on your proposal. Highlight changes you make to the original submission (use a bold font for these parts). [If you were assigned a different project, submit a proposal for this project but there will be no bold sections]. Add three new sections to the proposal, one at the beginning on how the instructor feedback from the first proposal submission was addressed and two at the end to indicate your current progress and how you'll be fulfilling the checklist requirements. Also, move the batch processing into the checklist.
This extended proposal should have the following structure:
- Summarize the peer and instructor feedback from the first submission and how you addressed these. (If you were assigned a new project, state that here and explain why.)
- Title: A short title indicating the topic
- Abstract: a description of the overall application problem that you would like to investigate (required).
- Input data: A description of the data being processed. Provide URLs for data that can be found on the Web.
- Data Products: What new information does this project produce that did not exist before? What are the tangible outputs? Modified road data? Statistical analysis? Pictures or illustrations to visualize the input and output or workflow are encouraged. If you use a found image, indicate the source.
- Revised pseudocode: Update based on feedback and add new sections. Be sure to include user input (GET) statements at the beginning of the pseudocode. Also include output statements (ADD data to the map, CAPTURE screenshot, INSERT screenshot in HTML, ADD tables to HTML, etc.)
- Keywords: Comma separated list of keywords relating to the project. These should include topic area, data types, and tools. This is meant to help other students search for related project topics.
- Progress report: Submit any code you have already written for the project or explain what other progress has been made, such as data preparation or testing of Geoprocessing tools. (You will be evaluated on making at least some progress.)
- Respond briefly to the requirement checklist:
Category I (Complete Cat. I a-f)
-
Python geoprocessing: Name one or two of the tools you will use.
-
Python batch processing (FOR or WHILE loops): State the processing problem you are handling with Python.
-
Functions: List descriptive names of 3 user-defined reusable functions and along with a docstring for each. Remember not to use functions presented as examples and not to create functions that are simply wrappers for geoprocessing tools.
-
Class: List a descriptive name and a docstring for a class you will use and one or more properties.
-
Mapping: One or two sentences explaining how you'll use the mapping module and what you'll be automatically adding to the map.
-
GUI: Submit a screenshot of your planned graphical user interface (See Figure 1 for an example) and a table with a list of parameter (should have the same columns as Table 1 below). The parameter table should contain a list of the parameters you are using along with their data type and their properties (Data Type, Direction, Default value, Filter and any other properties that you are setting). ALL parameters must have DEFAULT VALUES. The project should use at least 3 user inputs.
Category II (Pick one or more--tell us which one(s) you’ll do and briefly describe)
-
Reading and/or writing files with standard file objects or with cursors.
-
Reading and/or writing HTML to automatically generate an output report.
-
Reading and/or writing KML with BeautifulSoup.
- Downloading and uncompressing data from the web.
Category III (Pick one or more--tell us which one(s) you’ll do)
-
Use the tool validator to create dynamic behavior for the script tool.
-
Provide a portable toolbar button to launch the script tool.
-
Inform the user of progress, using messages.
-
Add the arcpy progressor to present messages.
- In the script tool, use the parameter filter property, the paramater "obtained from" propery, the parameter symbology property, or the Schema property.
-
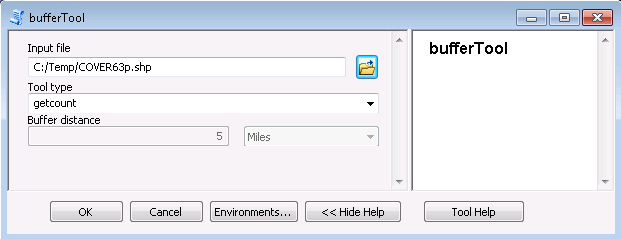
Table 1: Example of planned parameters and their properties:
|
Grading criteria
These proposals will be evaluated on the following criteria:
- Is the complexity sufficient and was the proposal updated based on the feedback?
- Are parts I-IX submitted? Has some progress been made, as shown in Section VIII?
- Checklist: Will the checklist be satisfied?
- GUI: Does the GUI request all the variables it should? Does the plan include at least 3 user inputs? Are Type, Direction, and Filter values appropriate?
- GUI: Have default values been specified for all input parameters in both the table and GUI image?